One such chatbot that has received widespread attention is ChatGPT, developed by OpenAI. ChatGPT is a highly advanced conversational AI model that can generate human-like responses to a wide range of questions and topics.
In this blog, we will explore how to create a chatbot app like ChatGPT using the Kotlin programming language. Whether you’re a beginner or an experienced developer, this guide will provide you with the knowledge and resources you need to build your chatbot app.
With this guide, you’ll be able to create your chat app that can understand and respond to natural language queries just like ChatGPT, opening up endless possibilities for your users.
Create Project
Open Android Studio and create a new project. Give the project name MyChatGPT.
How to Create a New Project in Android Studio
Adding dependency
For creating requests and getting responses from ChatGPT, we will use Volley in our project. Go to the app-level gradle file put the following code in your dependencies block and sync the project.
implementation 'com.android.volley:volley:1.2.1'
Getting OpenAI API Key
Go to the OpenAI official website and log in or sign up. In the API section, click on Create a new secret key. Copy the unique key and keep it in a secure place. We will use the API key in this project.
XML Code
Go to app > resource > layout > activity_main.xml. Add a layout file for getting input from users and showing responses. We are using two TextView and one EditText under RelativeLayout.
Here is the final xml code of activity_main.xml.
<?xml version="1.0" encoding="utf-8"?>
<layout xmlns:android="http://schemas.android.com/apk/res/android"
    xmlns:tools="http://schemas.android.com/tools">

    <RelativeLayout
        android:layout_width="match_parent"
        android:layout_height="match_parent"
        tools:context=".MainActivity">

        <ScrollView
            android:layout_width="match_parent"
            android:layout_height="match_parent"
            android:layout_above="@id/text_field"
            android:layout_alignParentTop="true">

            <LinearLayout
                android:layout_width="match_parent"
                android:layout_height="wrap_content"
                android:orientation="vertical">

                <TextView
                    android:id="@+id/chat_request"
                    android:layout_width="match_parent"
                    android:layout_height="match_parent"
                    android:layout_margin="16dp"
                    android:fontFamily="sans-serif-medium"
                    android:text="Question"
                    android:textColor="?attr/colorOnSurface"
                    android:textIsSelectable="true"
                    android:textSize="18sp" />

                <com.google.android.material.divider.MaterialDivider
                    android:layout_width="match_parent"
                    android:layout_height="wrap_content" />

                <TextView
                    android:id="@+id/chat_response"
                    android:layout_width="match_parent"
                    android:layout_height="match_parent"
                    android:fontFamily="sans-serif"
                    android:padding="16dp"
                    android:text="Here is the answer"
                    android:textColor="?attr/colorOnSurface"
                    android:textIsSelectable="true"
                    android:textSize="17sp" />
            </LinearLayout>
        </ScrollView>

        <com.google.android.material.textfield.TextInputLayout
            android:id="@+id/text_field"
            android:layout_width="match_parent"
            android:layout_height="wrap_content"
            android:layout_alignParentBottom="true"
            android:layout_margin="16dp"
            android:hint="Ask any thing">

            <com.google.android.material.textfield.TextInputEditText
                android:id="@+id/user_query"
                android:layout_width="match_parent"
                android:layout_height="match_parent"
                android:ems="10"
                android:gravity="center_vertical"
                android:imeOptions="actionSend"
                android:inputType="text"
                android:textSize="16sp" />
        </com.google.android.material.textfield.TextInputLayout>
    </RelativeLayout>
</layout>
Kotlin Code
Go to app > java > com.example.mychatgpt > MainActivity.kt and paste the following method. Using the getResponse() method, we are sending requests and getting responses in JSON objects. Have a look at the following code.
private fun getResponse(query: String) {
    binding.chatRequest.text = query
    binding.userQuery.setText("")

    val queue: RequestQueue = Volley.newRequestQueue(applicationContext)
    val jsonObj = JSONObject()
    jsonObj.put("model", "text-ada-001")
    jsonObj.put("prompt", query)
    jsonObj.put("temperature", 0)
    jsonObj.put("max_tokens", 500)
    jsonObj.put("top_p", 1)
    jsonObj.put("frequency_penalty", 0.0)
    jsonObj.put("presence_penalty", 0.0)

    val postRequest: JsonObjectRequest =
        object : JsonObjectRequest(Method.POST, url, jsonObj,
                Response.Listener { response ->
                val responseMsg: String =                        response.getJSONArray("choices").getJSONObject(0).getString("text")
                binding.chatResponse.text = responseMsg
            },
            Response.ErrorListener { error ->
                Log.e("TAG", "Error : " + error.message + "n" + error)
            }) {
            override fun getHeaders(): MutableMap<String, String> {
                val params: MutableMap<String, String> = HashMap()
                params["Content-Type"] = "application/json"
                params["Authorization"] =
                    "Bearer YOUR_API_KEY"
                return params;
            }
        }
     postRequest.retryPolicy = object : RetryPolicy {
        override fun getCurrentTimeout(): Int {
            return 50000
        }

        override fun getCurrentRetryCount(): Int {
            return 50000
        }

        @Throws(VolleyError::class)
        override fun retry(error: VolleyError) {
        }
    }
    queue.add(postRequest)
}
In this project, we have used the text-ada-001 model. You can use any of the four models available.
Here is the final Kotlin code MainActivity.kt
package com.example.mychatgpt

import android.os.Bundle
import android.util.Log
import android.view.inputmethod.EditorInfo
import android.widget.TextView
import android.widget.Toast
import androidx.appcompat.app.AppCompatActivity
import androidx.databinding.DataBindingUtil
import com.android.volley.RequestQueue
import com.android.volley.Response
import com.android.volley.RetryPolicy
import com.android.volley.VolleyError
import com.android.volley.toolbox.JsonObjectRequest
import com.android.volley.toolbox.Volley
import com.example.syllabustrack.databinding.ActivityMainBinding
import org.json.JSONObject

class MainActivity : AppCompatActivity() {
    private lateinit var binding: ActivityMainBinding
    var url = "https://api.openai.com/v1/completions"

    override fun onCreate(savedInstanceState: Bundle?) {
        super.onCreate(savedInstanceState)
        binding = DataBindingUtil.setContentView(this, R.layout.activity_main)
        setContentView(binding.root)

        binding.userQuery.setOnEditorActionListener(TextView.OnEditorActionListener { _, actionId, _ ->
            if (actionId == EditorInfo.IME_ACTION_SEND) {
                binding.chatResponse.text = "Please wait..."

                if (binding.userQuery.text.toString().isNotEmpty()) {
                    getResponse(binding.userQuery.text.toString())
                } else {
                    Toast.makeText(this, "Please ask something", Toast.LENGTH_SHORT).show()
                }
                return@OnEditorActionListener true
            }
            false
        })
    }

    private fun getResponse(query: String) {
        binding.chatRequest.text = query
        binding.userQuery.setText("")

        val queue: RequestQueue = Volley.newRequestQueue(applicationContext)
        val jsonObj = JSONObject()
        jsonObj.put("model", "text-ada-001")
        jsonObj.put("prompt", query)
        jsonObj.put("temperature", 0)
        jsonObj.put("max_tokens", 500)
        jsonObj.put("top_p", 1)
        jsonObj.put("frequency_penalty", 0.0)
        jsonObj.put("presence_penalty", 0.0)

        val postRequest: JsonObjectRequest =
            object : JsonObjectRequest(Method.POST, url, jsonObj,
                Response.Listener { response ->
                    val responseMsg: String =
                        response.getJSONArray("choices").getJSONObject(0).getString("text")
                    binding.chatResponse.text = responseMsg
                },
                Response.ErrorListener { error ->
                    Log.e("TAG", "Error : " + error.message + "n" + error)
                }) {
                override fun getHeaders(): MutableMap<String, String> {
                    val params: MutableMap<String, String> = HashMap()
                    params["Content-Type"] = "application/json"
                    params["Authorization"] =
                        "Bearer YOUR_API_KEY"
                    return params;
                }
            }

        postRequest.retryPolicy = object : RetryPolicy {
            override fun getCurrentTimeout(): Int {
                return 50000
            }

            override fun getCurrentRetryCount(): Int {
                return 50000
            }

            @Throws(VolleyError::class)
            override fun retry(error: VolleyError) {
            }
        }
        queue.add(postRequest)
    }
}
Make sure you have added internet permission in the AndroidMenifest.xml file. If not, paste the following code above the application tag.
<uses-permission android:name="android.permission.INTERNET"/>
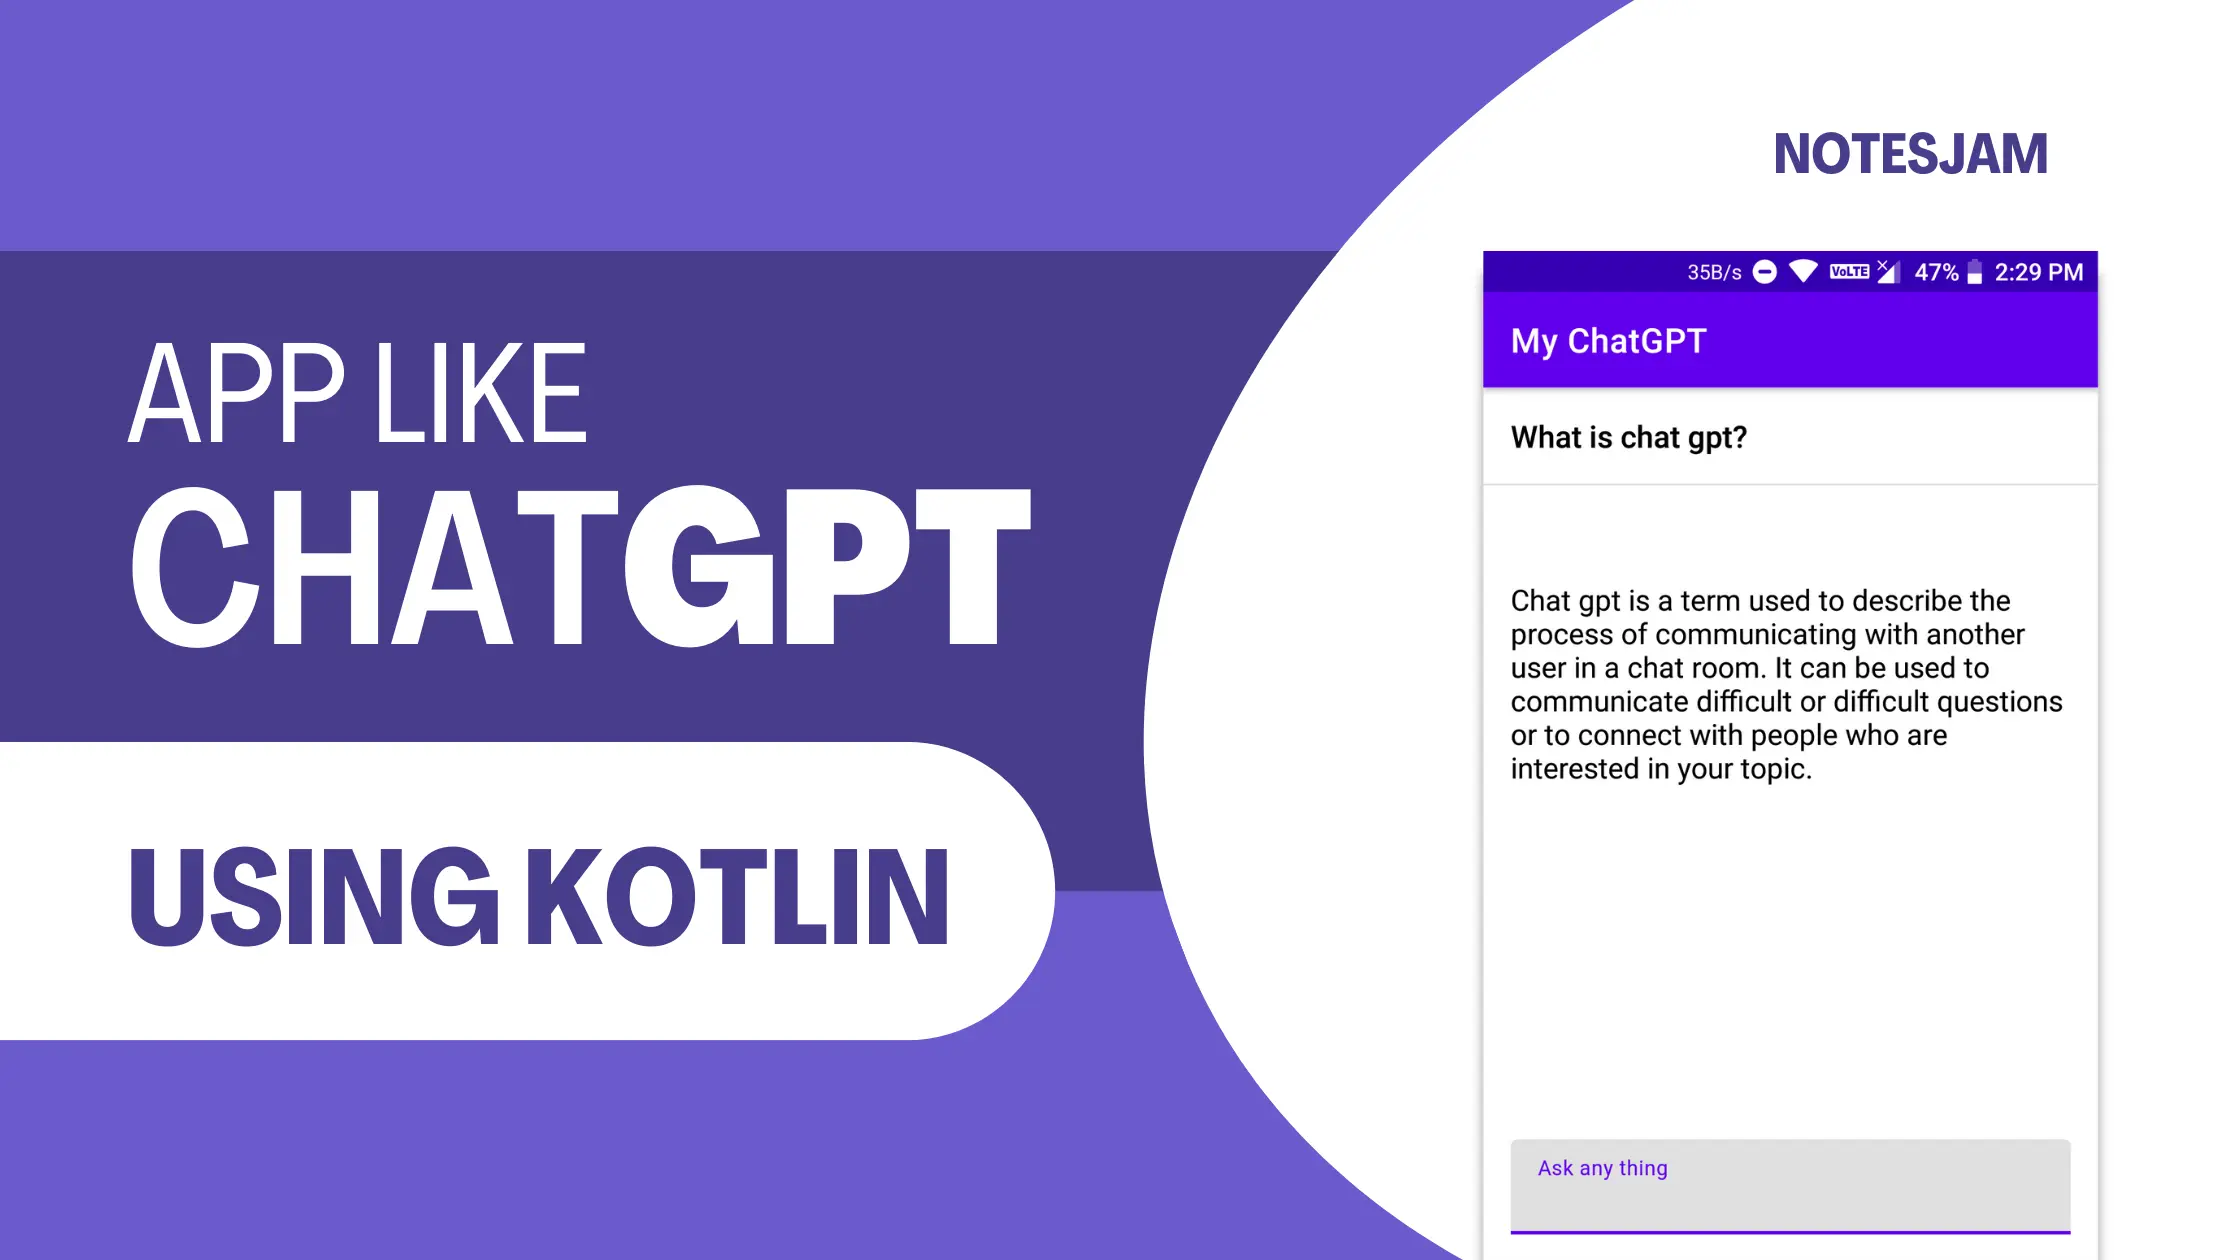
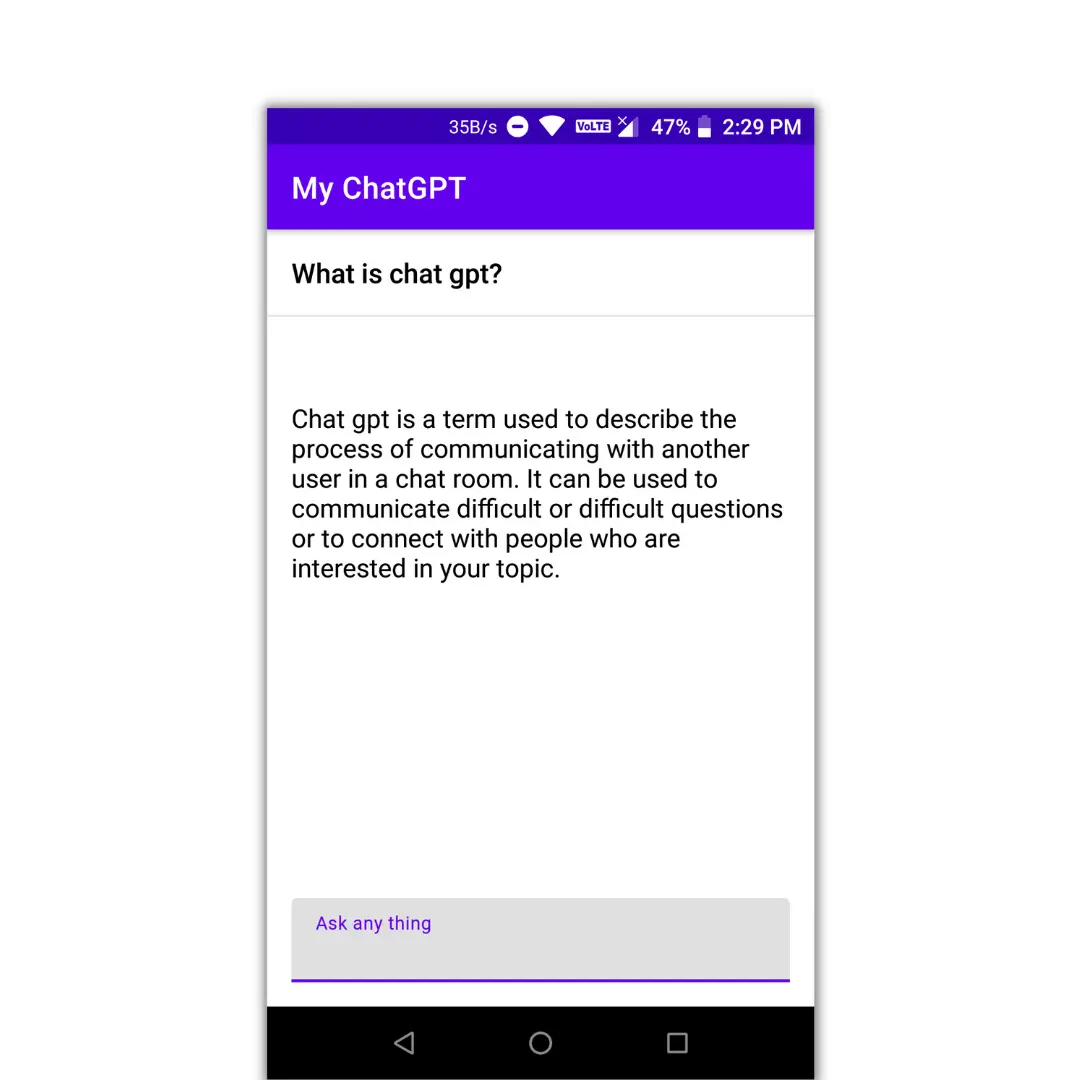
Output
Here is the final output.


Leave a Reply